# First Spring Boot application
In this chapter you will learn how to bootstrap a Spring Boot application using SpringInitializr. You will learn how to create a REST endpoint.
# Initialize the project
Navigate to https://start.spring.io (opens new window)
Create a new project with Gradle and Java 8. Select Spring Boot version 2.2.0 M3. Name the artifacts and group according the the following image. Add
Spring Webas a dependency.
Click on
Generate Project(or hitAlt+Enter) to download the generated project skeleton.Extract the downloaded archive and import the Gradle project in the IDE of your choice. In IntelliJ create a new project from existing sources. Make sure to tick the
Enable auto-importcheckbox in the last step of the dialog.Start the
SpotifyPlaylistApplication. In the logs you should be able to see, that the Tomcat server has been started on port 8080:2019-05-20 15:31:02.200 INFO 17572 --- [ main] o.s.b.w.embedded.tomcat.TomcatWebServer : Tomcat started on port(s): 8080 (http) with context path ''
# Implement your first REST endpoint
Create the file
HelloWorldController.javaInsert the following content. The
@RestControllertells Spring Boot that this is a REST endpoint. The@GetMappingdefines an endpoint, which can be accessed with the HTTP GET method. For the other HTTP methods like POST, PUT, DELETE, ... the corresponding annotations also exist.@RestController public class HelloWorldController { @GetMapping("/hello") public String helloWorld() { return "Hello World!"; } }Restart your Spring Boot application.
Visit http://localhost:8080/hello (opens new window) in your browser. You should be able to see the
Hello World!message from your server.
# Add Swagger
Swagger (opens new window) is a tool for documenting and testing REST endpoints. The integration with Spring Boot is very easy.
Add Swagger in the
dependenciessection of yourbuild.gradlefile:dependencies { // ... implementation 'io.springfox:springfox-swagger2:2.9.2' implementation 'io.springfox:springfox-swagger-ui:2.9.2' implementation 'org.springframework.plugin:spring-plugin-core:1.2.0.RELEASE' }Create the file
SwaggerConfig.javaalong theSpotifyPlaylistApplication.javafile. Insert the following content:@Configuration @EnableSwagger2 public class SwaggerConfig { @Bean public Docket api() { return new Docket(DocumentationType.SWAGGER_2) .select() .apis(RequestHandlerSelectors.any()) .paths(PathSelectors.any()) .build(); } }Restart your Spring Boot application and navigate to http://localhost:8080/swagger-ui.html (opens new window).
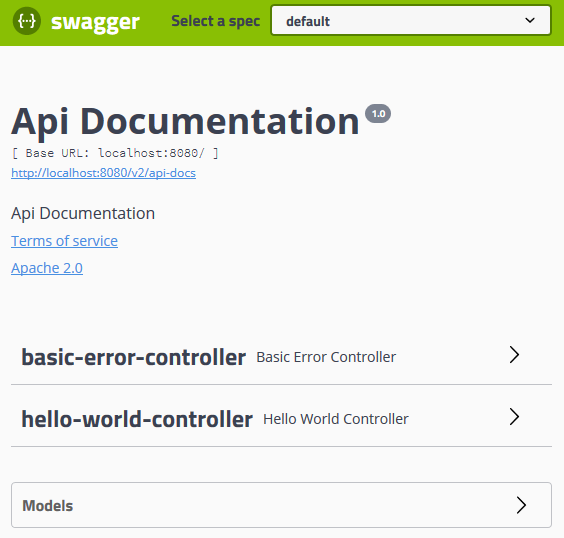
Open the hello-world-controller and click on the
Getrequest. Click then onTry it outand execute the request from the Swagger UI.
# Tracking the application in Git
Before you can deploy your app to Heroku, you need to initialize a local Git repository and commit your application code to it.
git init
git add .
git commit -m "My first commit"
# Deploy the application to Heroku
Login using your Heroku credentials.
heroku login -iThe heroku
createCLI command creates a new empty application on Heroku, along with an associated empty Git repository. The Git repository is automatically set as a remote for your local repository.heroku apps:create <APPLICATION NAME> --region euDeploying the application
git push heroku master
...
https://<APPLICATION NAME>.herokuapp.com/ deployed to Heroku
EXERCISE
- Test the deployed application using the Swagger UI.