# Use the Spotify API
There are various possibilities to integrate the Spotify API into your own application. We could either access directly the REST endpoints or use a wrapper API. In this chapter you will learn how to connect to the Spotify API using a Java wrapper.
# Set up your developer account
Prior to using the Spotify API you have to create a developer account. Navigate to https://developer.spotify.com/dashboard/ (opens new window) and log in with your account. Create a new app.
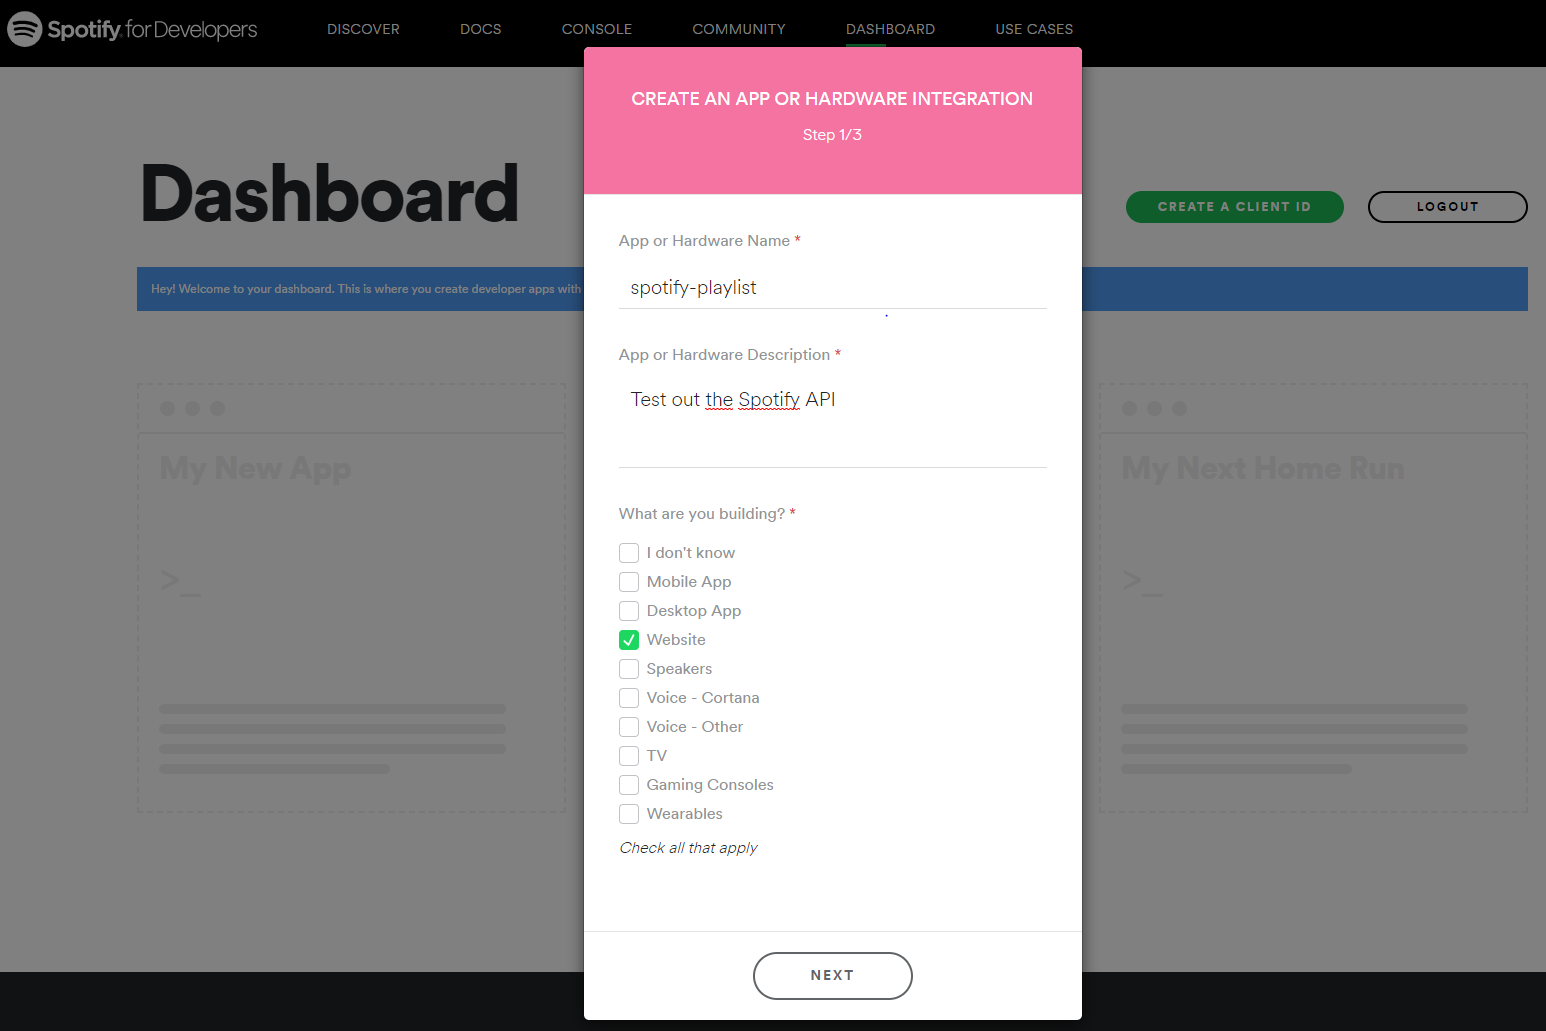
Select No when asked if you want to develop a commercial integration.
You have to agree to the license agreements in order to use the API.
On the next page you can now look up your Client ID and secret, which are needed for accessing the Spotify API from your application.

In the application.properties in the resources directory, we are adding the client id and secret as properties.
spotifyPlaylist.clientId=YOUR CLIENT ID
spotifyPlaylist.clientSecret=YOUR CLIENT SECRET
The properties in the application.properties could also be set directly when starting the application by command line arguments.
# Architecture
The following figure shows the classes, we are going to implement.
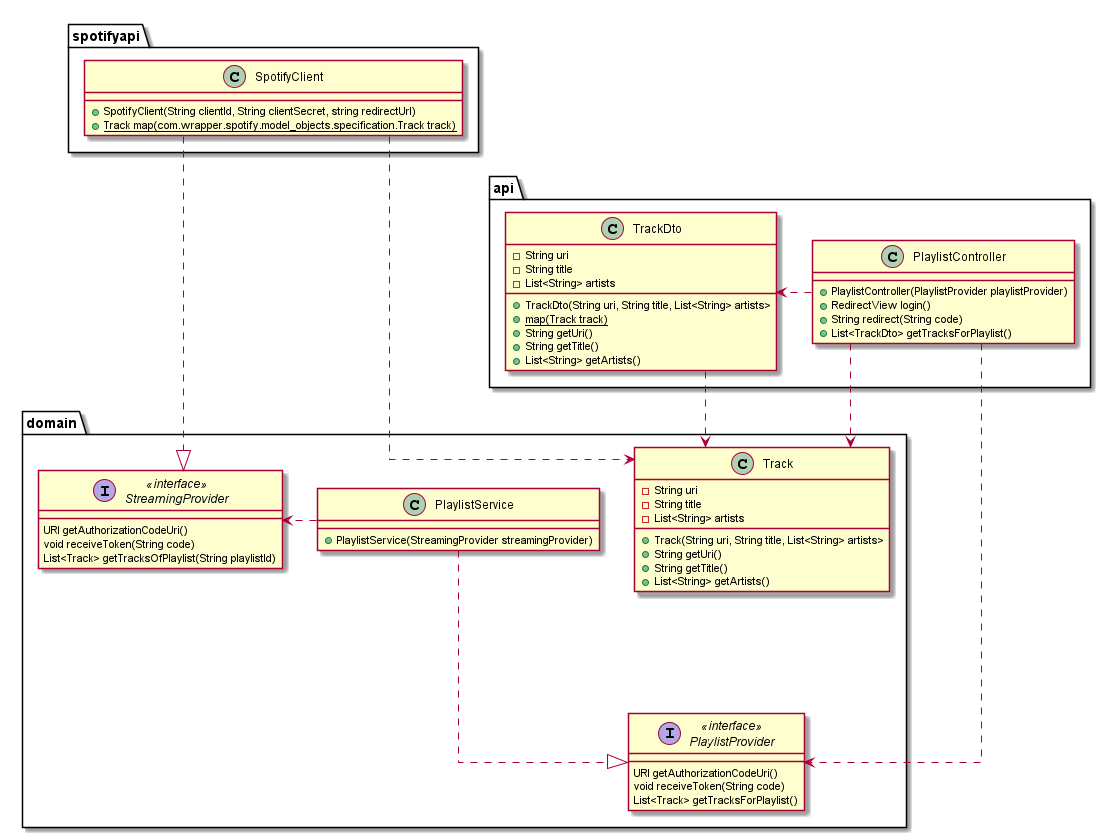
We can already create the model class Track inside the domain package.
public class Track {

    private final String uri;
    private final String title;
    private final List<String> artists;

    public Track(String uri, String title, List<String> artists) {
        this.uri = uri;
        this.title = title;
        this.artists = artists;
    }

    /* getters */

}
Simultaneously, we can create the TrackDto class inside the api package.
It looks very similar to the Track class, however it also contains a map method, which maps a Track to a TrackDto.
public class TrackDto {

    private final String uri;
    private final String title;
    private final List<String> artists;

    public TrackDto(String uri, String title, List<String> artists) {
        this.uri = uri;
        this.title = title;
        this.artists = artists;
    }

    /* getters */

    public static TrackDto map(Track track) {
        return new TrackDto(track.getUri(), track.getTitle(), track.getArtists());
    }

}
We are creating those two very similar classes, because they serve different purposes.
Track is used internally as an entity, which will be mapped to from the corresponding classes of the Spotify Web API.
TrackDto is used as the DTO, which is sent over the web by the REST controller.
# Login to the Spotify Web API
We are using the Java wrapper API thelinmichael/spotify-web-api-java (opens new window) for accessing the Web API of Spotify.
Add the dependency to your build.gradle file:
dependencies {
    // ...
    implementation 'se.michaelthelin.spotify:spotify-web-api-java:2.1.2'
}
For accessing the API we have to authenticate the application first. The image below shows the authentication flow for getting a token on the backend.
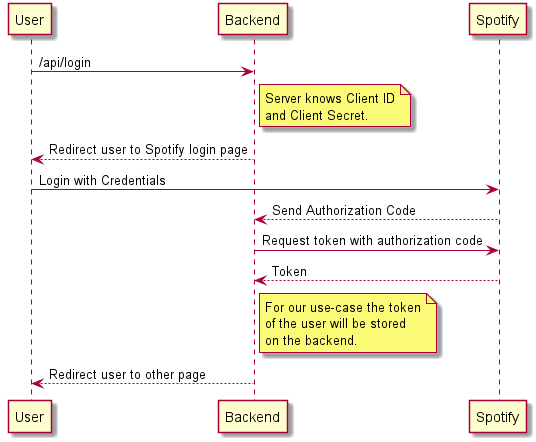
When the user opens the /api/login endpoint with his browser, the backend should redirect him to the login page of Spotify.
After logging in on the Spotify website it redirects the user back to a defined URL, which can be chosen by the developer.
For this we add another property in the application.properties file.
spotifyPlaylist.redirectUrl=http://localhost:8080/api/spotify-redirect
For this application we are making some compromises, which limit the ability of our application to scale. E.g. we are storing the token on the backend. The way we are going to implement this, makes the application only usable for editing one user's playlist at a time.
Now we start with the implementation.
We create the interface StreamingProvider inside the domain package.
This interface will be implemented by a class which connects to the Spotify Web API wrapper.
The goal of this abstraction is, that we could easily replace the access to the Spotify API and use Google Play Music or other streaming providers instead, if we wanted to.
public interface StreamingProvider {

    URI getAuthorizationCodeUri();
    void receiveToken(String code);
    List<Track> getTracksOfPlaylist(String playlistId);

}
The next step is to implement this interface with the SpotifyClient class inside the spotifyapi package.
This class connects to the Spotify Web API through the dependency we added.
You can see that we inject with @Value the properties we have set in application.properties into the constructor.
In the constructor we instantiate an object of the SpotifyApi class.
The SpotifyApi class is part of the wrapper library.
The @Component annotation before the class definition is needed by Spring Boot and it will allow us to inject instances of this class as a dependency into other classes.
@Component
public class SpotifyClient implements StreamingProvider {

    private final SpotifyApi spotifyApi;

    public SpotifyClient(@Value("${spotifyPlaylist.clientId}") final String clientId,
                             @Value("${spotifyPlaylist.clientSecret}") final String clientSecret,
                             @Value("${spotifyPlaylist.redirectUrl}") final String redirectUrl) {

        URI uri = SpotifyHttpManager.makeUri(redirectUrl);
        spotifyApi = new SpotifyApi.Builder()
                .setClientId(clientId)
                .setClientSecret(clientSecret)
                .setRedirectUri(uri)
                .build();
    }

    public URI getAuthorizationCodeUri() {
        return null;
    }

    public void receiveToken(String code) {
    }

    public List<Track> getTracksOfPlaylist(String playlistId) {
        return Collections.emptyList();
    }

}
Now we can start with implementing the methods of the interface.
We implement the method getAuthorizationCodeUri, which generates the URI to the Spotify login page.
This URI will contain the client id and redirect URI back to our application as parameters.
The scope tells Spotify, which access rights the user needs to grant the application for using it.
public URI getAuthorizationCodeUri() {
    AuthorizationCodeUriRequest authorizationCodeUriRequest = spotifyApi.authorizationCodeUri()
            .scope("playlist-modify")
            .build();

    return authorizationCodeUriRequest.execute();
}
Now we implement another interface PlaylistProvider inside the domain package.
This interface will be implemented by classes, which are an abstraction between the REST controller and the class which accesses the Spotify Web API.
public interface PlaylistProvider {

    URI getAuthorizationCodeUri();
    void receiveToken(String code);
    List<Track> getTracksForPlaylist();

}
As you can see this interface is pretty similar to the StreamingProvider interface, however, they serve different purposes.
We implement this interface in the PlaylistService class inside the domain package, which separates the access to the Spotify API from the business logic of our application.
We inject an object of the StreamingProvider interface in the constructor.
Spring Boot recognizes that SpotifyClient is an implementation of StreamingProvider and will therefore inject an instance of SpotifyClient.
@Service
public class PlaylistService implements PlaylistProvider {

    private StreamingProvider streamingProvider;

    @Autowired
    public PlaylistService(StreamingProvider streamingProvider) {
        this.streamingProvider = streamingProvider;
    }

    public URI getAuthorizationCodeUri() {
        return streamingProvider.getAuthorizationCodeUri();
    }

    public void receiveToken(String code) {
    }

    public List<Track> getTracksForPlaylist() {
        return Collections.emptyList();
    }

}
The getAuthorizationCodeUri method of the PlaylistService does nothing else than calling the corresponding method in the StreamingProvider implementation.
We create a controller PlaylistController inside the api package, which will handle all the requests to our backend server.
It has to serve the /api/login endpoint, which redirects the user to the Spotify login page.
The URI to which the user is redirected can be received from an implementation of the PlaylistProvider interface, which we inject with the constructor.
This endpoint is used so that the user does not need to know the client secret from the Spotify API.
@RestController
@CrossOrigin
@RequestMapping("/api")
public class PlaylistController {

    private PlaylistProvider playlistProvider;

    @Autowired
    public PlaylistController(PlaylistProvider playlistProvider) {
        this.playlistProvider = playlistProvider;
    }

    @GetMapping("/login")
    public RedirectView login() {
        URI uri = playlistProvider.getAuthorizationCodeUri();

        RedirectView redirectView = new RedirectView();
        redirectView.setUrl(uri.toString());
        return redirectView;
    }

    @GetMapping("/spotify-redirect")
    public String redirect(@RequestParam String code) {
        return code;
    }

}
If you start the application now and navigate to http://localhost:8080/api/login (opens new window) in a browser you will be seeing an error message:
INVALID_CLIENT: Invalid redirect URI
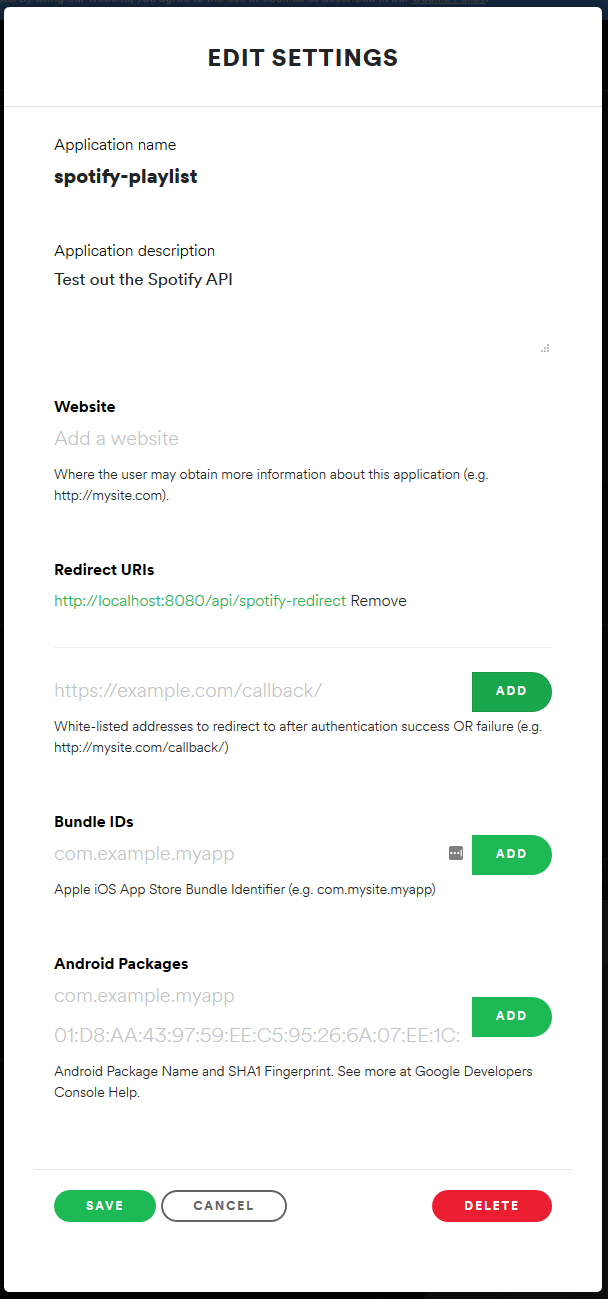
This is because we have to whitelist all our redirect URLs on the Spotify API website.
For doing this navigate to https://developers.spotify.com/dashboard (opens new window) and click on your application.
Then click on the green Edit settings button and add a redirect URL.
If you try to access http://localhost:8080/api/login (opens new window) again, you should be redirected to the Spotify login. Maybe you are going to be asked, if you want to give your application the permission to access your account with it. After a successful login you should be redirected back to your backend application and should see the authorization code in your browser.
Getting the authorization code is just an intermediate step in getting the token for gaining access to the api.
Therefore we have to implement a new method in SpotifyClient to receive a token from a valid auth code.
If we have the token, we can store it directly within the spotifyApi instance.
The token is lost when the application is restarted.
public void receiveToken(String code) {
    try {
        AuthorizationCodeRequest authorizationCodeRequest = spotifyApi.authorizationCode(code)
                .build();

        final AuthorizationCodeCredentials authorizationCodeCredentials = authorizationCodeRequest.execute();

        spotifyApi.setAccessToken(authorizationCodeCredentials.getAccessToken());
        spotifyApi.setRefreshToken(authorizationCodeCredentials.getRefreshToken());
    } catch (IOException | SpotifyWebApiException e) {
        System.out.println("Error: " + e.getMessage());
    }
}
Now that we have this method, we just have to call it in the PlaylistService and PlaylistController.
// PlaylistService
public void receiveToken(String code) {
    streamingProvider.receiveToken(code);
}

// PlaylistController
@GetMapping("/spotify-redirect")
public String redirect(@RequestParam String code) {
    playlistProvider.receiveToken(code);
    return code;
}
If you restart the application and navigate to http://localhost:8080/api/login (opens new window), the application does the same thing as before.
But under the hood, the token is set in the SpotifyApi instance and the api now can be used for accessing playlists and tracks.
# Get all tracks of a playlist from Spotify
First we create the endpoint /playlists/tracks for getting the tracks of a playlist in our PlaylistController.
We want this endpoint to return a list of tracks.
We can already call the corresponding method of the PlaylistProvider implementation, however, we need to map from Track to TrackDto.
@GetMapping("/playlists/tracks")
public List<TrackDto> getTracksForPlaylist() {
    return playlistProvider.getTracksForPlaylist().stream()
            .map(TrackDto::map)
            .collect(Collectors.toList());
}
Spring Boot will automatically translate the returned list of TrackDto to a JSON representation when calling the REST endpoint.
We have to call the getTracksOfPlaylist method of the StreamingProvider implementation in the PlaylistService.
For this example we use a hardcoded playlist ID.
Create a new Spotify playlist, add some tracks and copy the ID at the end of the playlist URL.
public List<Track> getTracksForPlaylist() {
    return streamingProvider.getTracksOfPlaylist("YOUR PLAYLIST ID");
}
EXERCISE
Extract the playlist ID to a property.
In the class SpotifyClient we have to implement a method for accessing playlist throught the wrapper API.
You can find examples on how to request playlist tracks from the API on Github (opens new window).
The Spotify API returns a Paging object which is a container for multiple PlaylistTrack objects.
If you look at the code of those classes it becomes clear, that we have to map the Track from the wrapper library inside the PlaylistTrack to our own Track entity, because that is the expected return value of the getTracksOfPlaylist method.
For doing this, we implement a map method inside SpotifyClient and map all entities in the getTracksOfPlaylist method.
private static Track map(com.wrapper.spotify.model_objects.specification.Track track) {
    return new Track(track.getUri(), track.getName(), Arrays.stream(track.getArtists())
            .map(ArtistSimplified::getName)
            .collect(Collectors.toList()));
}

@Override
public List<Track> getTracksOfPlaylist(String playlistId) {
    GetPlaylistsTracksRequest getPlaylistRequest = spotifyApi.getPlaylistsTracks(playlistId).build();

    try {
        Paging<PlaylistTrack> paging = getPlaylistRequest.execute();
        return Arrays.stream(paging.getItems())
                .map(PlaylistTrack::getTrack)
                .map(SpotifyClient::map)
                .collect(toList());
    } catch (IOException | SpotifyWebApiException e) {
        System.err.println("Error: " + e.getMessage());
    }
    return emptyList();
}
Now you can start the application, login (opens new window) and access the tracks of your playlist (opens new window).
EXERCISE
- The heroku
configcommands makes it easy to manage your app’s config vars.
heroku config:set spotifyPlaylist.clientId=<CLIENT ID>
heroku config:set spotifyPlaylist.clientSecret=<CLIENT SECRET>
heroku config:set spotifyPlaylist.playlistId=<PLAYLIST ID>
heroku config:set spotifyPlaylist.redirectUrl=https://<APPLICATION NAME>.herokuapp.com/api/spotify-redirect
- Push your changes to Heroku and test the application.
EXERCISE
Create the following endpoint:
GET /api/tracks?query={queryString}
The request takes a GET parameter query which is a String.
The endpoint should search tracks which match the query and return a list of tracks.
Limit the result to 10 entries.
You can have a look at the example (opens new window) provided by the Java wrapper Github project.
Add the necessary methods to the interfaces.
# Example call
curl http://localhost:8080/api/tracks?query=aaa
# Example result
The call should respond with HTTP status code 200.
[
  {
    "uri": "spotify:track:4TI9XHuNZMQWNSN77inA3b",
    "title": "Genesis (Live / AAA)",
    "artists": [
      "Justice"
    ]
  },
  // ...
]
EXERCISE
Create a new endpoint, which allows the insertion of multiple tracks to the playlist.
POST /api/playlists/tracks
In the body of the request the endpoint expects a list of strings, which represent the track URIs.
Add the necessary methods to the interfaces.
# Example call
curl --header "Content-Type: application/json" \
    --request POST \
    --data '["spotify:track:4TI9XHuNZMQWNSN77inA3b", "spotify:track:6dX3nqfZpmktmO26eWdYw4"]' \
    http://localhost:8080/api/playlists/tracks
# Example result
The call should respond with HTTP status code 200 and the tracks are added to the playlist.